PIONEER DJM-S9
SETUP
Connections
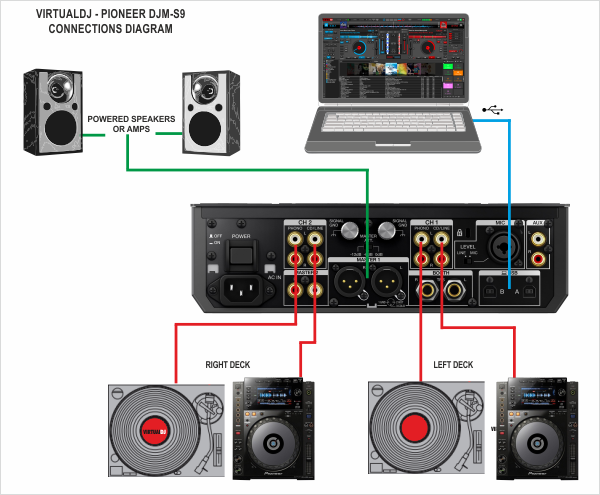
- Connect your computer to USB port A or B at the rear panel of Pioneer DJM-S9
- Optionally, connect each of your deck’s RCA cables to ANALOG INPUTs CH1/CH2 respectively, depending on which software deck you wish to control.
Choose the LINE or PHONO Inuts depending on your device (CD player, turntable. Secure the ground wire to a Phono Ground terminal). - Set the SOURCE selector at the top panel for DECKs to the USB position A or B depending on the port you have used to connect with your computer.
- Connect the Pioneer DJM-S9 with AC power using the provided cable and power on the unit
Note: Usage of turntables or CD players (for DVS) is not necessary. The mixer may be used as a pure MIDI mixer. VirtualDJ is also offering the ability to control all the software decks with even with a single timecode unit. See Timecode (DVS).
Drivers
For both Windows and Mac OSX computers :
Install the latest firmware and drivers from https://www.pioneerdj.com/en/product/mixer/djm-s9/black/support/#info
VirtualDJ 8 Setup
Once VirtualDJ is launched, a Login Window will appear. Login with your virtualdj.com account credentials.
A Pro Infinity or a Pro Subscription License is required to use the Pioneer DJM-S9. Without any of the above Licenses, the mixer will operate for 10 minutes each time you restart VirtualDJ.
http://www.virtualdj.com/buy/index.html

Click on the “DJM-S9” button and VirtualDJ will automatically create and apply the pre-defined audio configuration using the built-in audio interface of the Pioneer DJM-S9
Set the SOURCE selector at the top panel for DECKs to the USB position A or B depending on the port you have used to connect with your computer.
Click to OK.
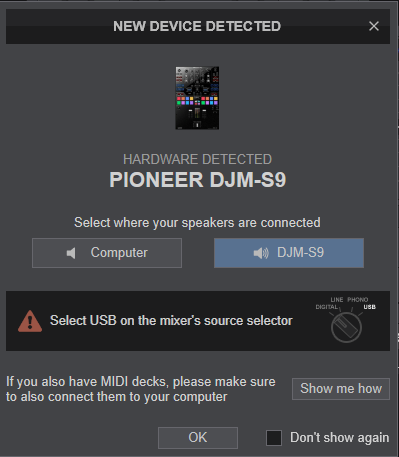
The unit is now ready to operate with VirtualDJ.
MIDI Operation
The unit should be visible in the CONTROLLERS tab of Config and the “factory default” available/selected from the Mappings drop-down list.
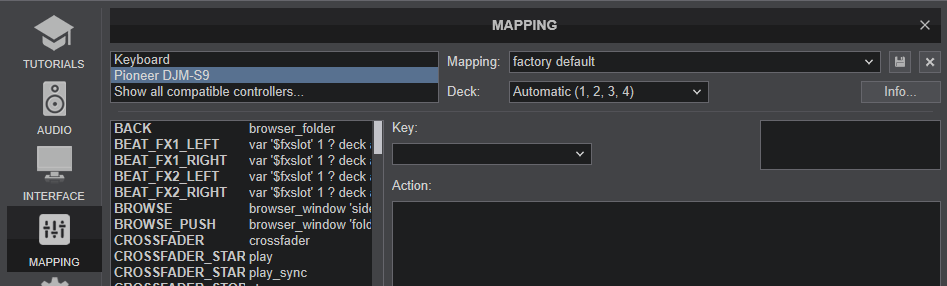
The factory default Mapping offers the functions described in this Manual, however those can be adjusted to your needs via VDJ Script actions.
Find more details at
http://www.virtualdj.com/wiki/VDJ8script.html
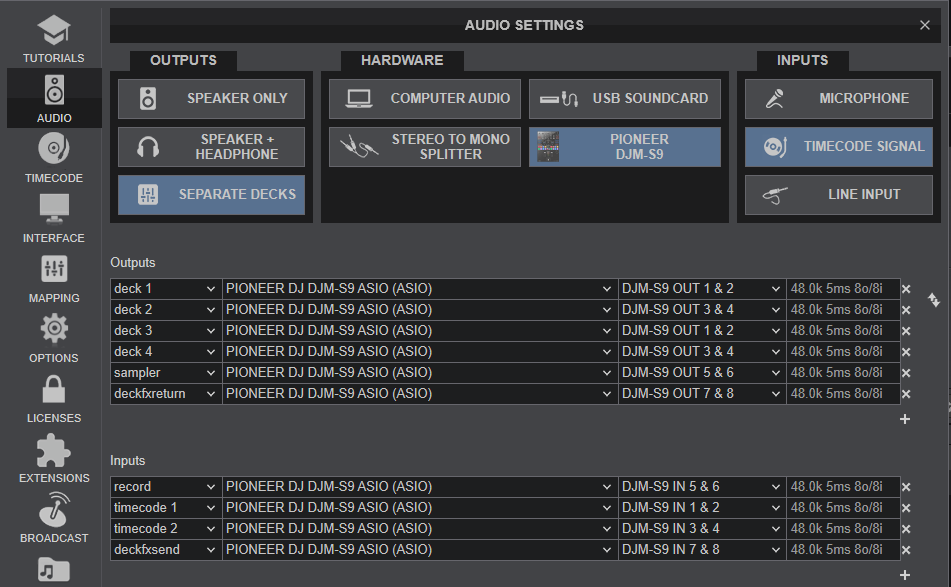
AUDIO Setup
The unit has a pre-defined Audio setup and a special button in the AUDIO tab of Config to provide that. Alternative setups can be applied in the same window. See Advanced Setup
For further software settings please refer to the User Guide of VirtualDJ 8.
http://www.virtualdj.com/manuals/virtualdj8/index.html
LAYOUT

Even though the Pioneer DJM-S9 is capable of sending MIDI signals from all faders, buttons and knobs, the mixer part of the unit is not controlling the internal mixer of VirtualDJ. The audio mixing is operated from the hardware.
The Crossfader, Equalizer, Filter, Volume faders etc. will move the relative faders of the VirtualDJ GUI, but not vice versa (Fake mixer mode)
S. SHIFT. Press and hold this button to access secondary functions of other controls on the DJM-S9
The functionality of each button, knob and connection per section (as shown in the image above) will be explained in detail in the next chapters
A. Mixer Controls
B. Pads
C. Effects
D. Equalizer
E. Browser & Loop Controls
F. Front & Rear Panels
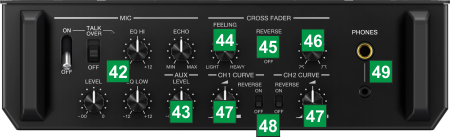
MIXER
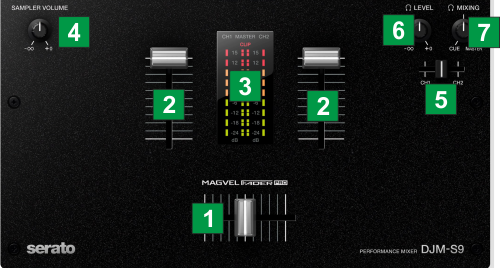
KEY
ACTION
SHIFT (SECONDARY) ACTION
Requires Fader Start/Stop/Sync feature enabled from Preferences
Requires Fader Start/Stop/Sync feature enabled from Preferences
Additional note
- The entire mixer section of the unit is Hardware operated. The VirtualDJ internal mixer is not used, even thought the knobs on the GUI follow the actual ones (fake mode)
PADS
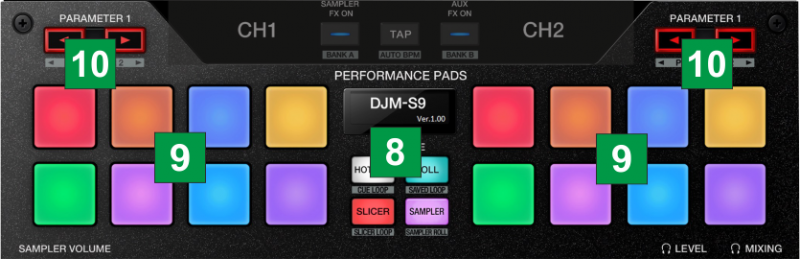
KEY
ACTION
SHIFT (SECONDARY) ACTION
HOT CUE : Hotcues, CueLoop, KeyCue pages
ROLL : LoopRoll, Saved Loops, Loop pages
SLICER : Slicer, BeatJump, Manual Loop pages
SAMPLER : Sampler, Sampler Roll, Custom pages
Selection behavior depends on the selected option from Preferences
Selection behavior depends on the selected option from Preferences
For more info about Pads , see http://www.virtualdj.com/manuals/virtualdj8/interface/decks/decksadvanced/pads.html
EFFECTS
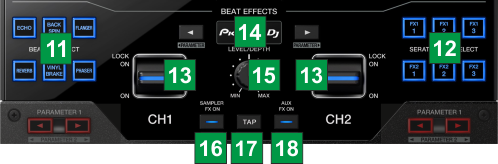
KEY
ACTION
SHIFT (SECONDARY) ACTION
Hardware Effects can be selected from the Pioneer DJM-S9 Preferences
No functionality when Software Effect is selected.
Hold down for more than 2 seconds to save the selected Effects on Slots 1-3 to Bank A
Hold down for more than 2 seconds to save the selected Effects on Slots 1-3 to Bank B
Additional notes for VirtualDJ Effects.
- Due to Hardware limitations, both Left and Right Decks will use the same Effect for the 3 FX Slots. The blinking FX button indicates which one of the 3 available FX Slots will apply to the Left/Right assigned Decks if the FX LEVER switches are used.
- Only one Hardware or Software Effect at a time can be applied on each Deck.
- Only one Deck can have Post-Fader Effects (currently Echo and Reverb are Post-Fader Effects)
EQUALIZER
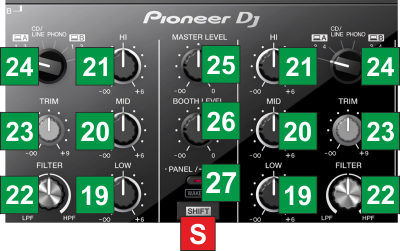
KEY
ACTION
SHIFT (SECONDARY) ACTION
Left selector : Deck 1 (USB A), Deck 3 (USB A), CD/LINE (CH1), PHONO (CH1), Deck 1 (USB B), Deck 3 (USB B)
Right selector : Deck 2 (USB A), Deck 4 (USB A), CD/LINE (CH2), PHONO (CH2), Deck 2 (USB B), Deck 4 (USB B)
Hold for more than 2 seconds to enter the Utilities menu of the unit.
Additional note
- The entire Equalizer, Filter and Master section of the unit is Hardware operated. The VirtualDJ Equalizer and Filter are not used, even thought the knobs on the GUI follow the actual ones (fake mode)
BROWSER & LOOPS

KEY
ACTION
SHIFT (SECONDARY) ACTION
Push to toggle focus between Folders and Songs List
Push the same button fast twice to clone the track from the opposite deck to the Left/Right Deck
FRONT & REAR PANELS
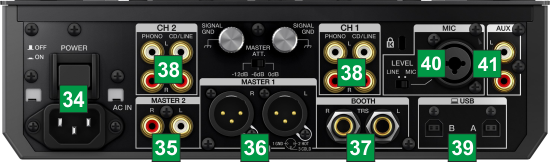
KEY
Operation
KEY
Operation
ADVANCED SETUP
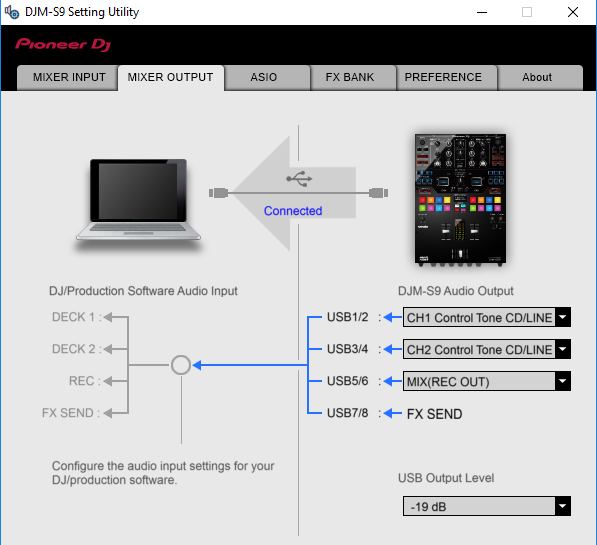
The Pioneer DJM-S9 offers 2 built-in audio interfaces with 4 stereo Outputs and 4 stereo Inputs each. The Mixer Inputs are determined by the Input Select switchers at the top panel of the unit.
The USB Output Channels can be set to different modes via the Pioneer DJM-S9 Setting Utility
How to open the DJM-S9 Utilities:
For Windows computer:
Click on the ASIO button you will find in the AUDIO tab of VirtualDJ Settings or ...
Click [START] menu [All Programs] [Pioneer] [DJM-S9] [Pioneer DJM-S9 Settings Utility]
For Mac OSX computer:
Click [MACINTOSH HD] icon [Applications] [Pioneer] [DJM-S9] [Pioneer DJM-S9 Settings Utility]
Timecode (DVS)
VirtualDJ is offering DVS (Digital Vinyl System) support for the Pioneer DJM-S9. A Timecode Plus or Pro Infinity license is required. http://www.virtualdj.com/buy/index.html
Up to 2 Timecode Inputs are available to control any software decks via Timecode CDs or Vinyls.
Both Mixer Channels CH1 and CH2 can accept PHONO (for Timecode Vinyls). CD/LINE (for Timecode CDs)
Open the Pioneer DJM-S9 Setting Utility and set the USB 1/2 and 3/4 Channel Outputs to the appropriate mode (CD or PHONO Control tone)
In this example (as shown in the side picture), 2 Timecode CDs have been connected to CH1 and CH2
Close the Settings Utility
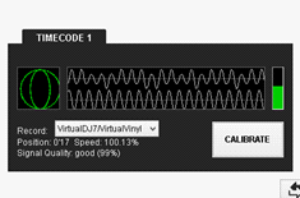
Press PLAY on your timecode CD and/or Vinyl device and VirtualDJ will automatically detect your Timecode type and make the appropriate adjustments for best performance.
Open the TIMECODE tab of the VirtualDJ Settings and choose the CALIBRATE button if for any reason the signal is not detected (possibly due to reversed phase connections).
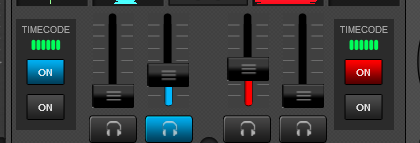
Click on the ON buttons from the TIMECODE panels of the Default Skin (in the SCRATCH center panel) to enable the Timecode control to any of the 4 software decks.
Recording
No adjustment is required in order to record (or/and broadcast) your mix with VirtualDJ. A record input is already pre-configured in the Audio Setup.. Just make sure the USB 5,6 Mixer Output from the DJM-S9 Utilities panel is set to REC (Out).
Open the MASTER center panel of the VirtualDJ GUI and click to the REC button (or BCAST for broadcasting) to record your mix.

The dedicated record input will include any Mixer Input such as Microphone, CH or AUX Inputs.
Back to Back
The Pioneer DJM-S9 has two USB ports, allowing simultaneous connection of two computers. Each port is completely independent. It is possible to run VirtualDJ on one computer and any other 3rd-party DJ-software on the other, Mac or PC.
How to:
- Connect the 2nd computer to the unused USB port on the DJM-S9.
- Switch the Source Select switcher on the non-playing mixer channel to the USB source of the 2nd computer.
- Play a track on this deck and mix it when ready – you ll now have audio from both computers during the mix.
- Fade out the audio playing from the 1st computer to the audio playing from the 2nd one.
- When only audio from the 2nd computer is left in the mix, remove the first computer.
- Assign the Source select switcher for the remaining free mixer channel to the 2nd computer and keep mixing.
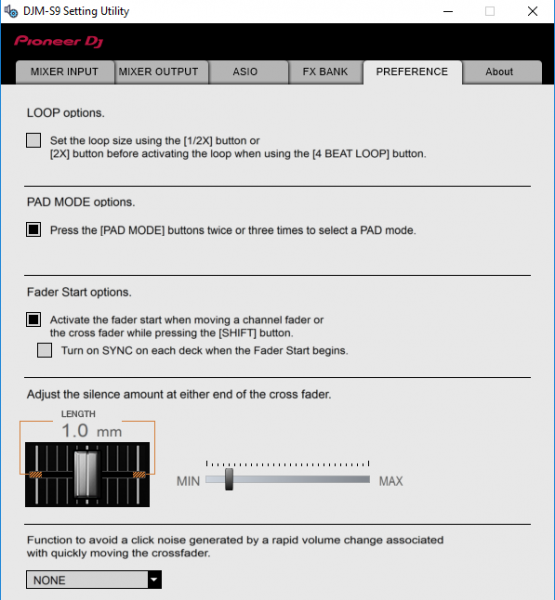
PREFERENCES
The Pioneer DJM-S9 Setup Utilities offer a few advanced options to choose from, such as the behavior of the LOOP buttons, the Fader Start/Stop/Sync feature for the Volume and Cross faders, adjustment for the Crossfader behavior and how the Pad mode buttons will be selected.
Make your adjustments via the PREFERENCES tab of the Pioneer DJM-S9 Utilities
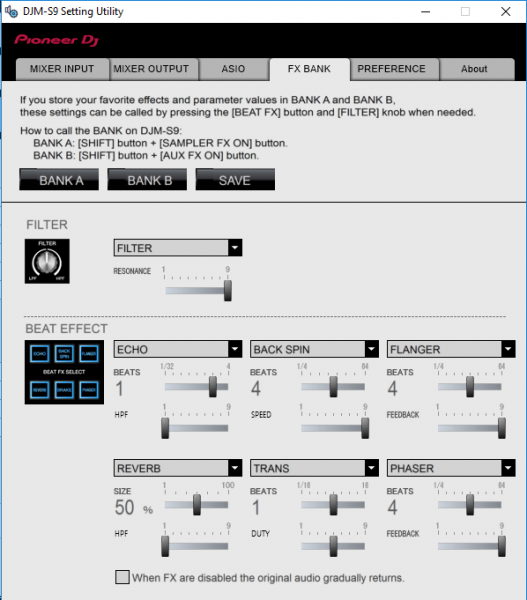
You can also choose the Effects of the 2 available FX Banks via the FX BANK tab of the Pioneer DJM-S9 Utilities. The selection of the FX Bank on the DJM-S9 is done via the SHIFT + SAMPLER FX and SHIFT + AUX FX buttons.
Note: Currently VirtualDJ is not supporting this feature for the Software Effects. Regardless of the selected FX Bank (A or B), the same VirtualDJ Effects will be used.